
개요
Coral TPU는 구글에서 만든 딥 러닝 가속 하드웨어이다. 분명히 C++을 이용하여 TPU 사용이 가능하다고 표현이 되어 있지만, 처음 사용한다면 많은 어려움이 존재한다. Python 형식으로는 바이너리가 제공이 되고 있어 쉽게 설치가 가능하다. 하지만 C++ 형식으로는 소스코드만 존재하고 따로 관련된 문서가 존재하지 않아 작성하게 되었다.
문서가 이게 끝이오..?
공식 문서로는 Bazel을 이용하면 정말 간단히 사용이 가능하다고 표현이 되어 있다. 그렇지만 Bazel이 아닌 CMake를 이용하여 사용하게 될 경우 지옥을 맛보게 된다. 공식적인 문서는 아래의 Dynamically link your code란 내용을 확인하면 되는데, 먼저 edgetpu 란 헤더를 추가 한 뒤 edgetpu 라이브러리를 빌드하여 적용해야한다고 되어 있다. edgetpu를 빌드 하기 위해선, Tensorflow Lite가 필요하다. 그렇지만 Tensorflow는 Bazel 툴로만 빌드가 가능하므로 Bazel이 있어야한다. 그래서 또 aarch64에 Bazel이 있는가? 존재 하지 않는다. 이로 인해 직접 빌드할 것인가, 크로스 컴파일 할것인가에 대해 고민하게 된다.
자, 먼저 X86 컴퓨터에서 Bazel을 설치하고, 크로스 컴파일러를 설치 한 뒤 Flatbuffers와 Tensorflow를 빌드 한다. 그런 다음 edgetpu를 빌드를 수행하면 edgetpu와 tensorflow-lite의 결과물을 얻게 된다. 이때 tensorflow의 버전이 2.5가 아닌 master 브랜치에서 빌드하게 될 경우 링킹 과정에서 오류가 발생하게 된다.
1
2
3
4
5
6
7
8
9
10
11
12
13
Statically link your code
1. Open your project's Bazel WORKSPACE file and add the libedgetpu repository as an http_archive.

2. Optionally, specify the TENSORFLOW_COMMIT version in your WORKSPACE, and pass this value as a dependency for building libedgetpu. Otherwise, add an empty libedgtpu_dependencies() in your WORKSPACE and rely on the default settings of libedgetpu.

3. To pull in libedgetpu for your binary, include a dependency on oss_libedgetpu_direct_all.

Dynamically link your code
1. Include the edgetpu.h or edgetpu_c.h file in your project.

2. Link to the libedgetpu.so file. You should have installed this library during device setup, but you can also build it yourself.

3. Clone the TensorFlow repo using the TENSORFLOW_COMMIT version specified here—that's the version used to build the libedgetpu.so library, so your TensorFlow version must match. Then build TensorFlow Lite (libtensorflow-lite.a) and also link to that.
외부 종속성을 가지는 대부분의 라이브러리를 빌드 하였다. 이제 CMake에서 Target_Link_Libraries를 통해 링킹하기만 하면 쉽게 적용이 가능하다.
미래에 훗날 누군가가 Coral TPU 제품을 구매하여 C++로 개발 해야 한다면 당장 글만 읽고 이해하기 많이 어렵다. 그래서 바로 프로젝트에 적용할 수 있도록 예제 템플릿을 깃허브에 작성하였다. 아래의 명령어를 수행함으로써 충분히 쉽게 적용이 가능하다.
[CMake-CoralTPU-Tutorial] 프로젝트는 해당 주소를 통해 확인이 가능하다.
1
2
3
4
5
6
7
8
9
10
11
# 우분투 기준으로 필수 프로그램
# 현재 보드에 연결된, TPU 장비를 검색하는 소프트웨어
$ sudo apt install ninja cmake gcc g++ make
$ git clone --recursive https://github.com/Piorosen/CMake-CoralTPU-Tutorial
$ cd CMake-CoralTPU-Tutorial
$ make lstpu && cd build
$ ./lstpu

# Model 빌드
$ make build && cd build
$ ./model test.tflite label.txt 0.5
위의 명령어를 통해 수행이 가능하다.
추가작업이 필요하다.
Coral TPU는 빌드하고 테스트가 가능한 환경을 구성하였다. 하지만 개발 가능한 환경을 구성한 것이지, 아직 신경망 모델을 TPU에 적합하게 변환하지 않았다. 그래서 아무런 tflite 모델을 가져와 실행하게 될 경우 CPU에서 동작하는 끔찍한 경험을 하게 된다.
TPU에서 MobileNetV2를 실행하게 될 경우 약 200fps가 나오며, Resnet101의 경우 10~20 fps 의 성능이 나와야지 정상이다. 라즈베리파이의 경우 USB2.0 이므로 이보다 못한 성능이 나오게 된다. 이는 문서로도 표기가 되어 있다.
Keras 또는 H5 모델을 TPU에 적합하게 변환하기 위해 총 2가지의 과정이 필요하다.
- Keras, H5 모델을 Tflite로 변환한다.
- TFlite를 TPU에 맞게 변환한다.
변환을 수행하기 위해 아래의 명령어를 수행이 가능하다.
1
2
3
4
5
6
7
8
9
10
11
12
13
14
15
16
17
18
19
20
21
22
23
24
25
26
27
28
29
30
31
import numpy as np
import argparse
import tensorflow as tf

def representative_data_gen():
    for _ in range(100):
      data = np.random.rand(1, 224, 224, 3)
      yield [data.astype(np.float32)]

if __name__ == '__main__':
    parser = argparse.ArgumentParser('tensorflow to tflite')
    parser.add_argument('-m', dest='modelFile', type=str, required=True, help='텐서플로우 모델 파일 이름')
    parser.add_argument('-o', dest='outputFile', type=str, required=True, help='TFLite 출력할 파일 명')
    args = parser.parse_args()

    model = tf.keras.models.load_model(args.modelFile)
    model.summary()

    converter = tf.lite.TFLiteConverter.from_keras_model(model)
    converter.optimizations = [tf.lite.Optimize.DEFAULT]
    converter.target_spec.supported_ops = [tf.lite.OpsSet.TFLITE_BUILTINS_INT8]
    converter.target_spec.supported_types = [tf.int8]
    converter.inference_input_type = tf.uint8
    converter.inference_output_type = tf.uint8
    converter.representative_dataset = representative_data_gen
    tflite_model = converter.convert()
    # Save the model.
    with open(args.outputFile, 'wb') as f:
        f.write(tflite_model)

    print('done')
변환이 성공적으로 되었다면, Edge TPU Compiler를 통해 모델 변환 한다. 명령어는 오직 X86 환경에서만 동작하므로 보드에서 실행하면 오류가 발생한다.
사용 방법은 간단하다. 설치 후, tflite 모델 정보를 기입하면 바로 변환이 된다.
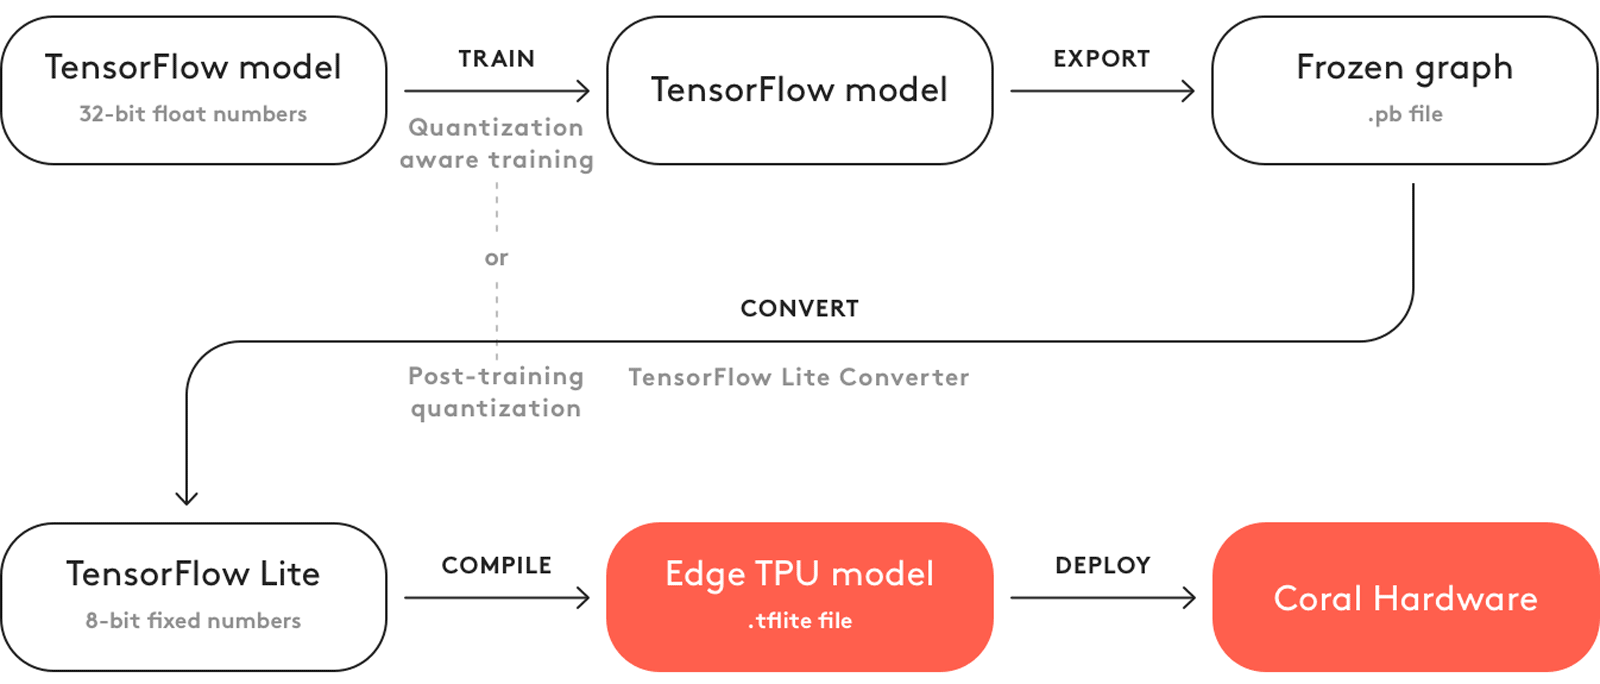
변환 과정은 위의 이미지 과정을 거친다고 보면 된다. Tensorflow Model을 TFLite로 변환하고, TFLite를 TPU에 적합하게 변환하는 과정이다.
Coral TPU는 오직 Int8, 정수연산만 수행이 가능하므로 이러한 복잡한 과정을 거치게 되는 것이다.